 |
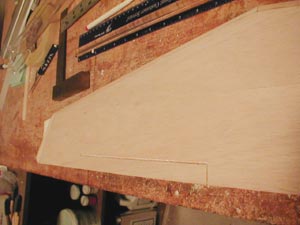
Turn the wing
over, and lay your steel ruler across the slits at the
aileron edges. Remove the blade from your Exacto knife.
Using the square end that fits in the handle, scribe
along the ruler from slit to slit. Your ailerons should
feel still and flex freely. One of the side benefits
of the glass is the warp resistance that it gives the
ailerons. If you didn't use the glass hinge, don't cut
the ailerons out unless you are ready to bevel them,
put the aileron linkages in and cover the wing in the
same day. The wood will warp over a few days if cut
free and left to sit due to moisture content in the
air. |
 |
|
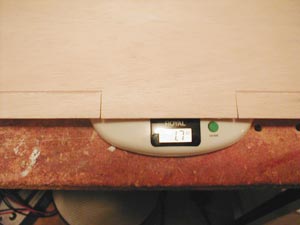 |
Your wing is finished. Get out
your scale and see how you've done! If you are this
far along, you are probably elated with what you've
accomplished. Remember that a commercially made balsa
wing like this one could be well over 2.5oz., and
still considered light by contemporary standards.
It's just like taking the weight of 2 servos out of
your airplane!
|
| |
|
|
Here's how the
weights worked out in this wing:
Cores: .4oz.
Skins: 1.0oz.
Weight of wing out of the bag, untrimmed and overlap
unsanded: 1.9oz.
Weight of wing trimmed, ready for LE and tips: 1.6oz.
LE and tips added but not sanded to shape: 1.8oz.
Wing carved and finish sanded, ready to go: 1.7oz.
Think about these weights and you'll
see something incredible! There are just .3oz of material
in this wing beyond the weight of the cores and skins.
This accounts for the spar, LE, tips and glue-about
8 or 9 grams in total. There is basically NO GLUE
in the wing, but it is VERY strong. Give your new
wing a pull!
|
| |
|
 |
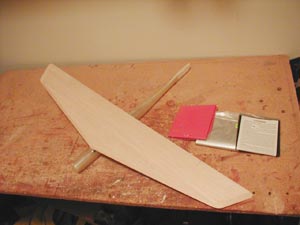
Remember what
I said about proof of adhesion? I purposely cut the
wingtips off with a coarse jeweler's saw. In this pic,
you'll see the saw and the cross section of the wing
where it ripped across. Notice that the balsa is splintered
badly(as you'd expect), but there is still total adhesion
between the cores and skins! |
| |
|
| When you install
the torquerods, just cover brass tubes with a slurry
of 5min. epoxy and microballoons. Just make sure to
put a little Vaseline in the tubes first. After it cures,
sand it smooth.
This wing was
meant to have the servo buried in the wing center
to make room in the fuse for the battery pack. After
you make your control linkage, mark the servo position
and cut a hole in the bottom sheeting. Pick the foam
out and attach the servo using 2-sided foam tape.
Secure with a few blobs of CA glue or Shoo Goo.
For wing hold-down
hard points, I like to router out ¾" holes
in the bottom of the wing without going through the
top skin. Fill this with epoxy and microballoons and
sand it flush again. These can get heavy, so keep
the diameter small and the ratio of microballoons
to resin high. You want a wet peanut-butter consistency
for the slurry, but be sure to use a screwdriver to
get it all the way in the hole. Mark your screw locations
in the top of the wing and drill through the hardpoints
with a drill that will be **just** a slip fit for
your screw. Use your core beds to do this. I know
that conventional wisdom is to use nylon bolts for
their 'break-away' safety feature, but I have never
seen a 400 model that the bolts sheared-even when
the model was a write-off after the crash. My preference
is drywall screws. They sit flush, self-tap into the
wingmounts, and most importantly, you can buy them
on a Sunday when the hobby shop is closed and you
dropped both of your screws in the grass!
|
| |
|
 |
Cover your wing now! Monokote will
work, but I will warn you-you won't believe how much
weight it adds to a wing. Using Monokote will negate
any work you did earlier to save weight. Plasticised
Lead is the only term that comes to mind..
If you have to use an iron-on covering,
stick with UltraCote Lite.
|
| |
|
| Good Luck and enjoy your new wing! You
stand a little taller when you tell a fellow flyer that
you vac-bagged the wing of your plane as you carry it
back to the flight line! |
|